💡 Today I Learned
12 things learned and counting.
Small, atomic things I've picked up — CLI tricks, language behaviors, tools, concepts.
I gotta stop raw-dogging Claude Code
I started playing with Claude Code a month ago, and to my horror I think I’ve been raw-dogging the experience with no protections. After hearing a few horror stories of important files being wiped, my incredibly risk-averse mind jumped into high gear looking for all the different ways to add layers of protection into using Claude on my personal machines. You will not catch me --dangerously-skip-permissionsing and giving OpenClaw all my personal information, that’s for sure.
There’s quite a few ways to skin this cat, some of which can be combined together:
- Trust the Claude Code
sandboxin your~/.claude/settings.json- I’ve heard this described as “trusting the fox to watch the hen house”. I haven’t done research beyond the anecdotal stories of it maybe escaping or just not working as one expects, so I think this is out.
- Claude Code for web
- This is useful for small self-contained changes, but I also want to be able to work from my laptop & be interactive with Claude & my code.
- Create a separate user with Unix user permissions
- This feels a bit clunky, and it doesn’t feel as simple as some of the other solutions. It feels easier to screw this up and either miss something, or make my life more difficult than it needs to be.
- Run on a different machine
- Fly.io Sprites
- Use my locally running Raspberry Pi as a dev box & connect with
tailscale.
- Use a local sandboxing tool
jai: they even have a nice summary how this compares to other options. tl;dr: more lightweight, but not as secure as container or separate VM.bubblewrap: people seem to be writing custom scripts that wrapbubblewrap, this is supposedly what Claude’ssandboxfeature uses under the hood.- Others I haven’t heard of yet.
- Use containers
yoloai: runs agent in YOLO mode inside a container; you get to check the diff before bringing it back into real file system website , readme .- This sounds neat; though I often develop on WSL2 on an older Windows laptop, so spinning up Docker as well does add a bit of resource overhead to this that I try to avoid most of the time.
- custom scripts I write for Docker containers or bubblewrap.
I’m trying to avoid letting “perfect be the enemy of good” here, so I want to pick some easy options and iterate on it in the future. My plan is:
- Everywhere: enable Claude Sandbox as a lightweight backup. Seems to have minimal downside to have a “defense in depth” of multiple approaches layered on each other.
- Laptop: install
jaiand update my bash aliases to havealias clanker=jai claude'.- This quickly ended: it looks like they don’t have package releases for Debian, only Arch, and it can’t be that mature of a tool if you are forced to build it from source just to use it. I’ll definitely keep an eye on this tool to see if it continues getting investment from the author.
- Desktop (beefier machine):
- Experiment with container sandboxing tools since I have way more RAM available. First one is
yoloai.
- Experiment with container sandboxing tools since I have way more RAM available. First one is
- Experiment to consider:
- Try Fly.io Sprites and see if they are cheap enough to be a common part of dev process
- Set up Tailscale & SSH so i can just use my desktop machine from laptop & phone easily. Let me benefit from the better RAM and CPU for all my development.
- I’m averse to developing on mobile, but I feel like I need to get over that millenial feeling of “big screen tasks”. I should get comfy directing Claude from the apps with Dispatch and the web version.
I should have changed my WSL2 resource config sooner
For a while I’ve been experiencing extreme slowness doing regular web browsing on my laptop, and it’s been frustrating the heck out of me. I use my desktop and work laptop on the same Wifi network, and they’re blazing fast, so what gives? I finally passed the threshold of discomfort enough to try to debug what’s happening.
Debugging Windows SlownessTo start, speed tests (and subjective experience on other devices) made the network an unlikely culprit. Resource usage seemed like the next thing to explore, since it might be able to pull down web pages super fast but then not have enough CPU & memory to make Firefox snappy.
Lo and behold, my habit of leaving VSCode (and the WSL2 VM) running alongside 30+ tabs for days on end seems to have been the issue. WSL (Windows Subsystem for Linux) was hogging ton of resources that could have been put to better use. To compare:
| CPU | Mem | Swap | Storage | |
|---|---|---|---|---|
| Laptop | 8 | 16GB | n/a | 1TB |
| WSL2 (old) | 🤬8 | 🤬8GB | 🤬2GB | n/a |
| ✨ WSL2 (new) | 5 | 5 | 4 | n/a |
Now I feel silly. It’s been taking up fully 1/2 of my RAM, and is allowed to hog all my processors if it wants to. Cherry on top is the swap is only 2GB, but I have a fully 900+ GB of extra space I could use for swap, we don’t need to be acting resource-constrained.
A breath of fresh air - changing the WSL2 configAs you can see in the table above, I droppped things down to more sane defaults, while still allowing it to be somewhat beefy. Even running a ton of Firefox tabs and numerous VSCode windows with WSL2, I still hadn’t hit more than 3.5 GB of RAM usage, so I felt comfortable using 5GB as breathing room. Also dropping CPUs down so I always have a few reserved for the host system, and then bumping up the swap since I have so much space it’s basically free.
I feel quite silly it took me this long to investigate and try things out, but my laptop feels SOOO much snappier now in the browser.
The new $HOME/.wslconfig file (
latest saved in my dotfiles
):
[wsl2]
memory=5GB
# allow around half of 8 logical cpus
processors=5
swap=4GB # we have lots of disk, don't be stingy

[experimental]
autoMemoryReclaim=gradual
networkingMode=mirrored  # ports open in WSL reachable as localhost on Windows, VPN works; watch for port conflicts
dnsTunneling=true        # correct DNS resolution with mirrored networking
sparseVhd=true # auto-compact virtual disk, minimal downsideThrowaway tools have no excuse for bad UX any longer
Now that LLMs have gotten relatively consistent at producing quality code in one shot (depending on the size & type of problem), I’m having to retrain my brain to realize that I should:
- Be making many more throwaway one-off tools
- I should care about the UX of them since it’s basically free to invest an extra 1 minute in adding those nice touches into the prompt
I could have spent a while digging in a raw CSV to “vibecheck” the data that was coming back from a generative process. That’s how I would have done it in the past.
Instead, I had an LLM write a Python script which turned the CSV into an interactive HTML page and including a bunch of extra sorting & quality of life improvements which surfaced insights I am not confident I would have noticed on my own, or I wouldn’t have invested the human time & energy to find them if the tooling hadn’t surfaced it.
Something like this also has very little risk from hallucinations or bad code, since they are often read operations, and/or the scripts will be acting on code in version control so you can revert any weird outcomes.
I will never use that specific script again, and that is OK - though the hoarder in me is sad because he wants to find a re-use for everything.
Update 3/13I heard Patio11 make a similar comment on his recent podcast episode on inference engineering . I love his word choice of “economically irrational”.
“You can ask them to write software that would have been economically irrational to write before—cases where the expected lifetime of that software is anywhere from a day down to a single execution” - Patrick McKenzie
Code Pattern: Separating Decisions and Actions
When developing, I keep running into situations where it turns out better to separate the decision making logic vs the actual actions that arise from it.
Benefits of separatingA couple clear benefits have popped out when I separate decisions from actions:
- Simpler to test
- Logic to make a decision is often self-contained & stateless, and can be written with few, if any, dependencies.
- You can pass real-time information, data from storage, user input, or whatever else - use dependency injection to make life easy.
- Makes assumptions explicit
- Instead of a morass of conditionals, you now have clearly labeled outcomes. It should be clear in the future if your assumptions about the array of possible outcomes is missing pieces.
There have to be downsides, right? I haven’t found any yet, but I’ll update this in the future if it bites me in the… leg.
Example pseudocodeA quick example to illustrate what I mean.
class Decision():
	pass

def make_decision(current_dt: datetime, records: List[dict], env: str) -> Enum:
	if current_dt > MIN_DT and len(records) > 5 and env == "PROD":
		return Decision.outcome_a
	else:
		return Decision.outcome_b

def take_actions(action_type: Enum):
	if action_type == Decision.outcome_a:
		update_db()
	elif action_type == Decision.outcome_b:
		update_db_flag()
		add_message_to_queue()
		start_background_job()
	else:
		raise ValueError('WHAT IS THIS UNKNOWN TYPE!')

def main():
	# collecting whatever inputs you need for decision
	now = datetime.now()
	records_from_db = db.get_filtered_set_of_records()
	env = os.environ["ENV"]
	# .... the sky is the limit....
	decision = make_decision(now, records_from_db, env)
take_actions(decision)My Backup Plan if Dex CRM Goes Kaput
I haven’t used Dex in a couple years at this point, although I still have the account. I found I wasn’t really using Dex to record notes on interactions or what I talked about with people. I still like the idea of being able to quickly find all the people who match a concept, e.g. find all my friends who like churning credit cards, or who would find this article about software dev interesting. Also it would be nice to be able to have a baseline of info we’ve talked about in the past so i don’t have to rehash the same conversations about where people work, what their hobbies are, etc. This is mainly useful for people I see less than every 6 months, whether they are long-term friend far away or acquaintance.
What do i use for now then?
- Fossify Contacts with some backup scripts to maintain key info like address, birthday
- Google Keep Note as a crappy way to trap recommendations from people so i can remember to tell them what I thought of the book/movie/article/etc.
- No solution for keeping track of what context is relevant for people other than my lossy brain
I like using Dex as my personal CRM - their workflows are fast, intuitive, and their support team responds really quickly if you need help. That said, nothing is guaranteed in life, so if anything ever happens to their company, I don’t want to lose all my contact information along with it. We need a Super Backup Plan™️.
My Backup Plan for Dex CRMDex is kind enough to make exporting your contacts data super easy, so we don’t have to do any crazy scraping hullabaloo to get what we need. My plan is real simple (harder to mess up that way!):
- Export my data from Dex
- Login to Dex, then go to the Settings->Export page . Download both of the files available.
- Upload the two CSVs (Notes & Contacts) into Nocodb/Airtable
Both Airtable and Nocodb (self-hostable, open-source Airtable alternative) have options that let you import a CSV file as a new Table.
On import it will ask you to choose the different field types to match Nocodb/Airtable types - ones I’ve already figured out and you can copy are: Contacts
GroupMembership - should be multi-select, their delimiter is ` ::: `. There are also individual columns, Group1, Group2,...etc.
LastSeenAt - DateTime
LastReminderAt - DateTime
NextReminderAt - DateTime
Notes
EventTime - DateTime
- Contact photos are on a CDN - you’ll need to come up with an alternative place to host/save them, if that’s worth your effort.
- Attempting to tie the
Notestable with theContacts- Looks like the
Link to Another Recordone-to-many is a good fit for a column tieing the two tables together, but have not figured out yet how to run them all automatically.
- Looks like the
Both of the new tables thriving in my self-hosted NocoDB instance - this is just a Proof of Concept to make sure the idea works, so not worried about reliability for now.

If I had no desire for a web based tool, there’s always loading the data into a SQLite DB - then I can query whatever my heart desires against it. I don’t have any complex needs other than easy access for editing (otherwise I won’t keep it up to date!) so this is more of a “if the mood strikes me” idea.
Personal CRMs: why/how- Reddit post does decent explanation of the benefit/why
- Nat Eliason runs his in Airtable for simplicity
- An example of a person who has configured Airtable to act as a quasi-Dex with reminders to reach out . I’ll just use Dex for now and keep this as a backup plan.
Serverless Design Pattern for Batch Processing with Fan Out
This is a simple serverless design pattern that has come in handy numerous times during my career. The problem: I need to process a large amount of data through a Lambda and am running into timeouts even at 15 minutes - or maybe I just need the process to hurry itself along.
Serverless Batch ProcessingThe design pattern only requires a single Lambda, with a conditional variable in the input that chooses how the Lambda will behave. It will either operate as A) the fan-out orchestrator, or B) process a single item/batch.
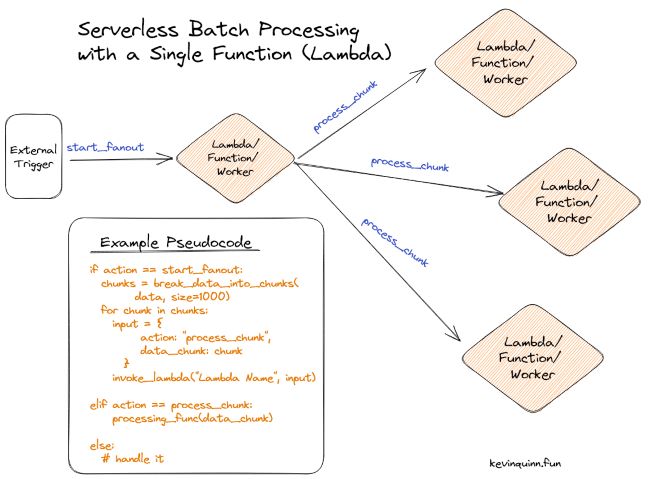
The pseudocode from the photo is repeated below:
action = input["action"] or "process_chunk"

if action == "start_fanout":
  chunks = break_data_into_chunks(
        data, size=1000)
  for chunk in chunks:
    input = {
         action: "process_chunk",
         data_chunk: chunk
      }
    invoke_lambda("Lambda Name", input)
elif action == "process_chunk":
    processing_func(data_chunk)
else:
  # handle it
In the example, action is our key conditional trigger.
There’s a few different ways you can vary the pattern to suit your needs. When input is first received to the start_fanout worker, it can either be passed as part of the input or just be used as the signal for the worker to go collect that information.
In the same vein, sometimes it makes sense to pull all the data and chunk it before passing it to process_chunk, other times you can pass something like an ID so the processor knows where to pull the data it has to act on.
You’ll need to have a way (and permissions!) to recursively invoke your function for this pattern to be an option. If on AWS, that might be **lambda:InvokeFunction **in the IAM role. A more widely usable pattern is available if your function sits behind an API - just make a request! Even the bare bones function runtimes provide the ability to make HTTP requests.
How to be Annoying with CSS Cursors (and a sprinkle of JS)
Looking for a new way to annoy1 your website visitors? Of course you are! How about changing their cursors to an emoji – and we won’t stop there. We’ll make that emoji change based on where they are on the page, wild stuff🤪!
WhyThanks to the wonderful CSS tips a friend unwittingly sent me, I was forced by the hands of fate to adopt the emoji cursor on my own site. If you don’t like it, you’ll have to take it up with them.
How can I do this too ???The most important bit is adding classes you can easily reference with the emoji cursor changes. Feel free to choose whatever 🖼 suits your fancy.
.emoji-cursor--default {
cursor: url("data:image/svg+xml;utf8,<svg xmlns='http://www.w3.org/2000/svg' width='40' height='48' viewport='0 0 100 100' style='fill:black;font-size:24px;'><text y='50%'>🏃♂️</text></svg>"), auto;
}
.emoji-cursor--astrocat {
cursor: url("data:image/svg+xml;utf8,<svg xmlns='http://www.w3.org/2000/svg' width='40' height='48' viewport='0 0 100 100' style='fill:black;font-size:24px;'><text y='50%'>🐱🚀</text></svg>"), auto;
}
.emoji-cursor--upside-down {
cursor: url("data:image/svg+xml;utf8,<svg xmlns='http://www.w3.org/2000/svg' width='40' height='48' viewport='0 0 100 100' style='fill:black;font-size:24px;'><text y='50%'>🙃</text></svg>"), auto;
}To make it change based on position, it’s a simple little function added in one of your js files:
let elem = document.getElementById("body");
document.onmousemove = function(event) {
    event.x;
    event.y;
    if (location.pathname == '/') {
        // Only be annoying on home page, defaults to runner
        const cursorTopHalf = event.y < (window.innerHeight/2)
        if(cursorTopHalf) {
          // do something with image classes
            elem.classList = ["emoji-cursor--astrocat"]
        } else {
            elem.classList = ["emoji-cursor--upside-down"]
        }
    }
}
And the last piece since I got lazy and wanted to just use an id, though you could definitely do it cleaner by making the elem lookup go find body without it:
...
<body id="body" class="emoji-cursor--default">
...Now you have everything necessary in your toolkit to ensure your visitors leave more perplexed than they came.
Of course you are, what a dumb questions. ↩︎
Add a Random Page Button to Hugo Site
I wanted to add a random button to one of my Hugo sites after remembering how handy it is on XKCD . Turns out it’s a really simple process with Hugo, just need to generate a JSON file and then write a simple script to choose your random article.
What are we making?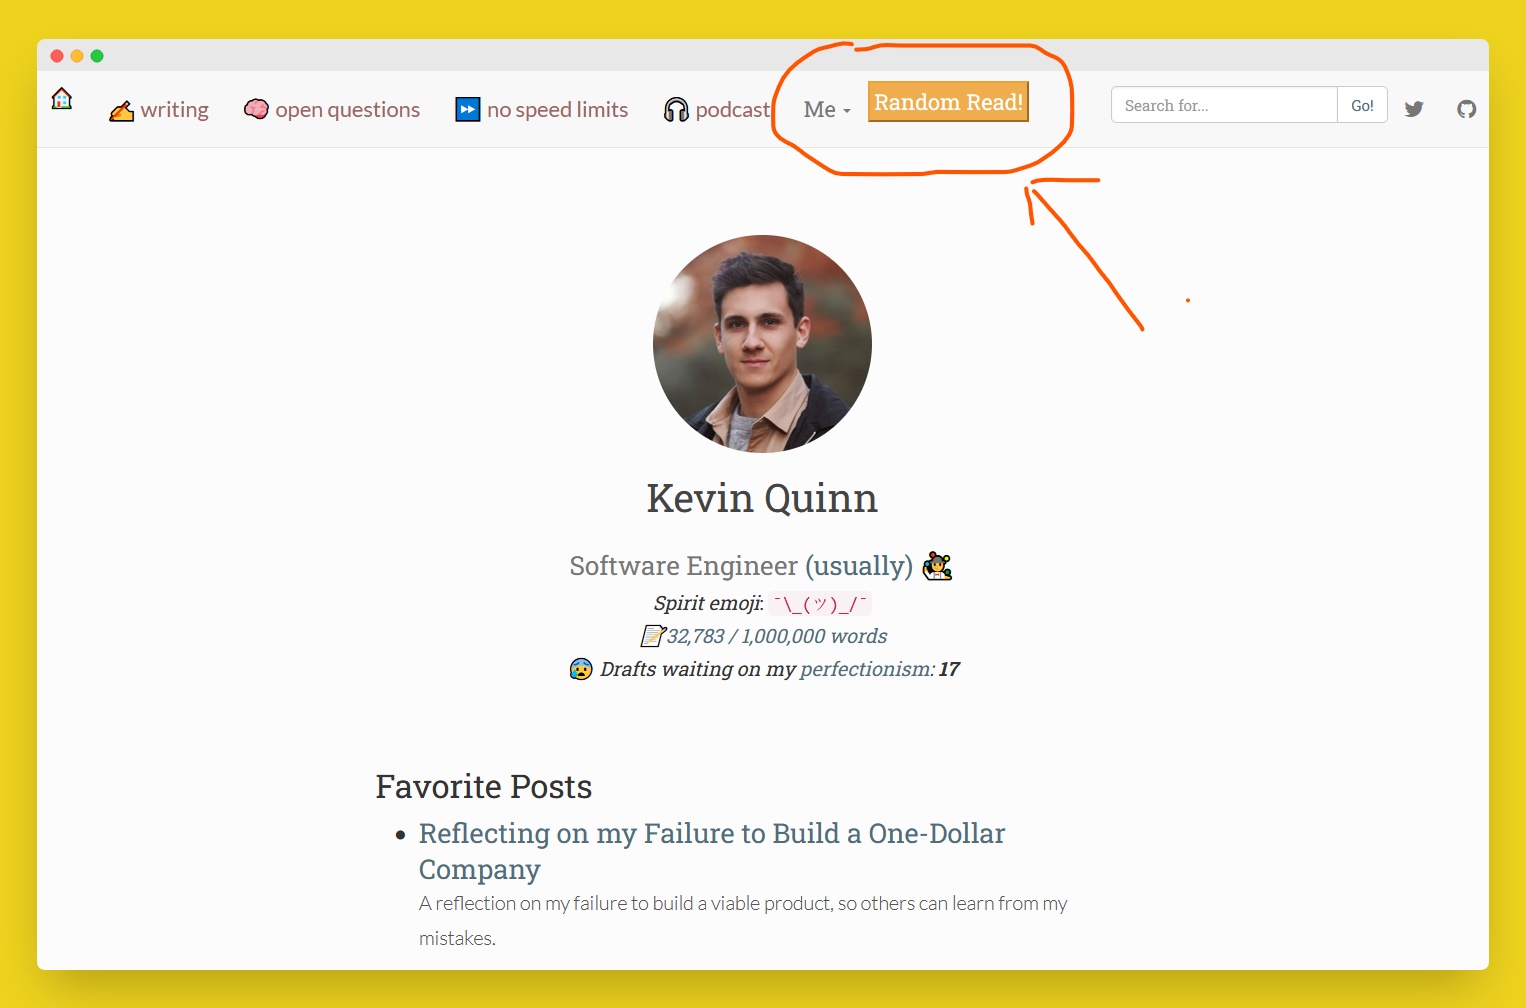
Hugo conveniently lets you output JSON data, so we create one at the root which will get deploy alongside the rest of our static files. Couple caveats for this example:
my filters are simple because the site only has one page archetype and I wanted all of them. You can definitely get mroe creative with Hugo’s
whereand other functions .This index for site search was already in the theme I was using. If you just want the randomizer, you can drop all the extra data fields like
layouts/_default/index.jsontagsandcontents.{{- $.Scratch.Add “index” slice -}} {{- range where site.RegularPages “Type” “in” site.Params.mainSections -}} {{ $date:= .PublishDate.Format “02”}} {{- $.Scratch.Add “index” (dict “title” .Title “date” $date “tags” .Params.tags “image” .Params.image “categories” .Params.categories “contents” .Plain “permalink” .Permalink) -}} {{- end -}} {{- $.Scratch.Get “index” | jsonify -}}
I needed to add a small param in my config.toml, here’s an article if you want to dive a bit deeper
and understand more of what is going on.
[outputs]
    home = ["json", "html"]
Prod JSON output
For reference, the JSON that the above Hugo code will end up outputting.
[
   {
     "categories": [
       "Developers"
     ],
     "contents": "text of the document",
     "date": "07",
     "image": "images/post/article-1.png",
     "permalink": "https://permalink",
     "tags": [
     	"Software Development"
     ],
     "title": "Title of the most recent article"
   },
 ...
 ]
You can add something similar to this in your HTML pages. I have this in a partial where the button is displayed on the page.
<script>
 var searchIndexData = [];
 // fetch on page load from the search index
 let json_path = window.location.origin + '/index.json'

 fetch(json_path).then(function (response) {
 	return response.json();
 })
 .then(function (data) {
 	searchIndexData = data;
 })
 .catch(function (err) {
 	console.log(err)
 });


 function sendToRandomArticle() {
 let randIndex = Math.floor(Math.random() * searchIndexData.length);
 let randArticle = searchIndexData[randIndex]['permalink'] + '?utm_source=RandomButton';
 window.location.href = randArticle;
 }

</script>
...
...
<button type="button" class="btn btn-primary" onclick='sendToRandomArticle()'>Random</button>
That’s it! Told you it was simple.
Python Parse RSS Feed With No Dependencies
I recently wanted to parse an RSS feed as a part of a larger script. Luckily, that boils down to just working with regular-old XML. Despite the proliferation of great libraries like BeautifulSoup, whenever possible I try to stick to the standard library. Not that using Pipenv or another Python dependency tool is necessarily a ton of work, it just feels like excess overhead. Plus, it’s just fun to explore libs I haven’t had the pleasure of interacting with.
Parsing RSS with Python standard libraryFor my use case, I wanted to parse the RSS file, then pull data from the latest article as well as randomly select a few of the older pieces. The minidom module is our friend for this task, and as always a helpful Stack Overflow led the way
.
from xml.dom import minidom
import random

FILE_PATH = 'public/index.xml'
NUM_FEATURED = 3
rss_dom = minidom.parse(FILE_PATH)
article_items = rss_dom.getElementsByTagName('item')

article_data = []
for item in article_items:
    title = item.getElementsByTagName('title')[0].firstChild.nodeValue
    link = item.getElementsByTagName('link')[0].firstChild.nodeValue
    article_data.append({'title': title, 'link': link})

print('main', article_data[0])


featured = []
for i in range(0, NUM_FEATURED):
    rand = random.choice(article_data)
    featured.append(rand)
    article_data.remove(rand)

print(featured)Add Search to Hugo Static Site in 5 Minutes with No Dependencies
Having search on your site is a big plus for the user experience (and for finding that piece of content I remember writing but can’t find!). My site isn’t big enough that it’s worth spending much effort setting up a real search solution like Algolia , Meilisearch , or even LunrJS .
Instead, I got inspiration from the past - let a search engine do the work for me, like so many sites in the 2000s. This is the 80/20 version of adding search to your site - a good enough option with minimal effort.
What are we adding
Search engines provide the option to search within a single website with site:<domain>. We will use that as our base - then sync an input box with a clickable link containing user text. On click, it takes them to the search engine page with the search filled for them:
site:kevinquinn.fun <user-input-text-here>Total additions to your codebase - 3.
- An input box, styled to your liking.
- A link tag.
- And a short script.
This site is built with an older version of Boostrap, but the core element is the <script> from this handy dandy Stack Overflow post
, then attach it to your input box.
<div class="input-group">
    <input id='search-input' type="text" class="form-control" placeholder="Search for...">
    <span class="input-group-btn">
    <a id='generated-link' target="_blank" class="btn btn-default" href="https://duckduckgo.com/">Go!</a>
    </span>
</div>
<script type="text/javascript">
    var link= document.getElementById('generated-link');
    var input= document.getElementById('search-input');
    input.onchange=input.onkeyup= function() {
        link.search= '?q=site%3Akevinquinn.fun+'+encodeURIComponent(input.value);
    };
</script>You just added search to your website in no time, give yourself a pat on the back! Is it the most amazing search in the world? No, not really - but it does the job. Most developer blogs only have a couple Hello World! posts anyway, so Algolia might just be a tiny, tiny, bit overkill. Now take that time you saved and get back to scrolling Hacker News.
Tiny Python Router for AWS Lambda APIs
I frequently run into the situation where I want the elegance of Python Flask routing on an AWS Lambda, but without the extra hassle of using the framework on a simple project. Golang has a mux built into the standard library, and a whole host of stand-alone routers , but so far I have not come across a good one for Python - so I made this. Is it the best possible? Definitely not. Does it meet my 80/20 use case? You betcha!
Use if…You want your Lambda code to read like a web framework, without adding heavy dependencies or setup of a real framework. It lets you:
- Set up simple path-based routing with very similar syntax to Flask.
- Add simple middleware for all your routes (Useful for simple logging, small modifications to
aws_event).
That’s it! Nothing fancy hiding here.
Do not use if…This is not right for every use case, especially:
- If you have path parameters you expect to be parsed for you and refuse to do yourself, or other complex features - AWS Lambda Powertools may be a better pick for you.
- Don’t want to maintain code.
- Really need a micro-framework like Flask and are avoiding the truth.
Diving in, the router is a simple class holding the mappings between method-path combos and the functions attached to them. Easy peasy.
tiny_router.pyclass RouteNotFoundException(Exception):
def __init__(self, msg: str) -> None:
self.msg = msg
super().__init__(self.msg)
class TinyLambdaRouter:
def __init__(self):
self._path_funcs = {}
self._middlewares = []
self.aws_event = None
self.aws_context = None
def middleware(self):
def decorator(f):
self._add_middleware(f)
return f
return decorator
def _add_middleware(self, func):
self._middlewares.append(func)
def route(self, path, **kwargs):
def decorator(f):
self._add_route(path, f, **kwargs)
return f
return decorator
def _add_route(self, path, func, **kwargs):
methods = kwargs.get('methods', ['GET'])
for method in methods:
search_key = f'{method}-{path}'
if self._path_funcs.get(search_key):
raise ValueError(f'Path {search_key} already registered with function {self._path_funcs.get(search_key).__name__}')
for method in methods:
search_key = f'{method}-{path}'
self._path_funcs[search_key] = {'function': func, 'kwargs': kwargs}
print(self._path_funcs)
def run(self, aws_event, aws_context):
self.aws_event = aws_event
self.aws_context = aws_context
# assumes using ALB or Api Gateway connected to Lambda
path = aws_event['path']
method = aws_event['httpMethod']
search_key = f'{method}-{path}'
try:
print(self._path_funcs)
path_func = self._path_funcs[search_key]['function']
kwargs = self._path_funcs[search_key]['kwargs']
except KeyError:
raise RouteNotFoundException(f'No handler found for path:{search_key}')
for m in self._middlewares:
# TODO: could get creative like Express, Flask and make this more exciting
m(self.aws_event)
return path_func(aws_event, aws_context, kwargs)
An example, you say? Why of course! I too am tired of digging through repos with crappy docs and no examples.
Save the router in
tiny_router.pyand the example intest_router.py.Run
python test_router.py.Thank the heavens you don’t have to install Flask just for simple routing.
import json
import random

from tiny_router import TinyLambdaRouter

app = TinyLambdaRouter()

@app.middleware()
def logging_middleware(aws_event):
  print('In da middleware for the request')
  aws_event['middleware'] = f'added_from_middleware-{random.randint(1,100)}'

@app.route('/implicit-health', extra_arg='an extra arg')
def implicit_health(aws_event, aws_context, kwargs):
  kwargs['middleware'] = aws_event['middleware']
  return {
    'statusCode': 200,
    'body': json.dumps(kwargs)
  }

@app.route('/health', extra_arg='an extra arg', methods=['GET'])
def health(aws_event, aws_context, kwargs):
  kwargs['middleware'] = aws_event['middleware']
  return {
    'statusCode': 200,
    'body': json.dumps(kwargs)
  }

def lambda_handler(event, context):
return app.run(event, context)

if __name__ == '__main__':
  events = [
    {'path': '/health', 'httpMethod': 'GET'},
    {'path': '/definitely/fake', 'httpMethod': 'GET'},
    {'path': '/health', 'httpMethod': 'PUT'},
    {'path': '/implicit-health', 'httpMethod': 'GET'}
  ]
  context = None
  for event in events:
    try:
    	print('Resp:', lambda_handler(event, context))
    except Exception as e:
      print(e)
      print('----------------------')
If this doesn’t fit your needs, there’s other routes you can take:
- Handle parsing routes yourself (not recommended 😬)
- AWS Lambda Powertools , has lots of features, but seems well liked.
- Lambda-router - not a bad option, but not my cup of tea.
- Tiny-Router - didn’t exist when I made the first version a couple years ago, though I’m glad to see I’m not the only one that finds this pattern useful.
- Biting the bullet and using Flask - Deploying a Flask app to AWS Lambda .
Convert Python Dict to JSON on the Command Line With Sed
Plenty of times I’ve run into logging Python dict and needing to convert them to JSON for whatever reason. Have run into this across numerous projects and working with a variety of people who have stumbled into the same issue.
What needs to change exactly?
" -> \"
' -> "
True -> true
False -> false
None -> nullSave your data into
file.txt.sedit up.echo -e "\n" && sed 's/"/\\"/g; s/'\''/\"/g; s/True/true/g; s/False/false/g; s/None/null/g' file.txt && echo -e "\n"
If you’d prefer to have the json in a file:
sed 's/"/\\"/g; s/'\''/\"/g; s/True/true/g; s/False/false/g; s/None/null/g' file.txt > file.json
A common question after this would be “Can I have it automatically get filled without copying?” - yes you can! A thread on how to send stdout to clipboard . Takeway:
- Linux - you’ll need to install a utility for it.
- Mac - you have
pbcopyandpbpastebuilt in.
In the future it would be nice to be able to paste directly and pipe through sed and have the output end up back in my clipboard, but that will have to wait for another day.